Are you coming to NYC for the holidays? Awesome! Here is a collection of Christmas events, trees and decorations landmarks in the city. Please note that all of these are completely free and you don't need to pay for a special tour to see them. You can visit the famous Dyker Heights Christmas Lights, for example, by simply taking the subway. The address is holiday lights displays from 82nd to 85th Street, between 10th and 13th Avenues, Brooklyn. How to get here from Manhattan: Take the subway, D train to 79 Street Station in Brooklyn and then walk about 15 minutes to 82nd Street and 10th Avenue. Before you go: This is an outdoor activity, so check the weather forecast, and look for a day with the warmest weather for this trip. Price: $5.50 for the subway, roundtrip, everything else is FREE of charge. Here is a live video from this beautiful neighborhood:
Of course, attending the lighting ceremony of the Rockafeller Center Christmas tree is very high on the "to-do list" of many people. Please note that is you want to attend the ceremony you should arrive early. Otherwise, this is what you should expect:
You can also go see the Christmas tree when it arrives at Rockefeller Center. It's much less crowded and you might even get some souvenirs from the famous tree:
Whether you decide to join the ceremony or not, you should definitely save a spot in your schedule to visit this place. Rockafeller Center is wonderful throughout the year and a pure magic during Christmas time:
And, while you are at Rockafeller Center, be sure to join the Winter Palace light show at the east end of the Channel Gardens projected on Saks Fifth Avenue:
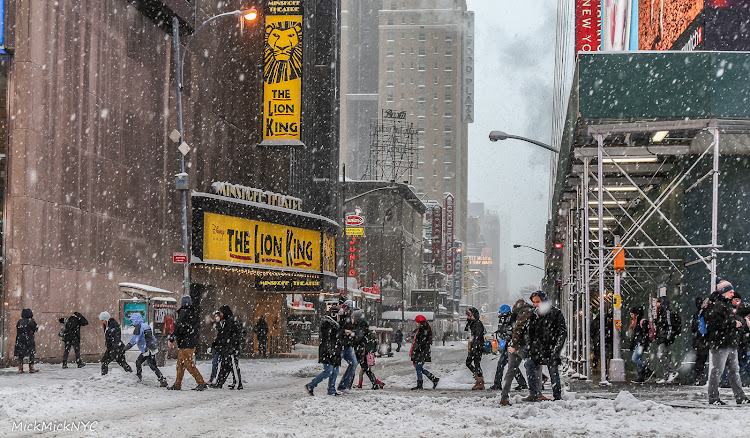
If it's snowing you should take it as a cue to put on your warmest coat, go out and explore the city, because there is nothing more spectacular than seeing NYC with all her Christmas decorations covered in white:
Actually, sometimes, it is so cold in here that even the famous Bryant Park Fountain freezes over:
There is a Christmas hub between Radio City, Rockafeller Center, Fifth Avenue, and Bryant Park and you can include them all in the same walk. You can start at the red ornaments and Radio City Christmas tree, walk to Rockafeller Center, Saks and south on Fifth Avenue to the NYPL and end your tour with a cup of hot chocolate at Bryant Park:
Here are some more Christmas landmarks and events in NYC:
Tavern on the Green in Central Park
Macy’s Holiday Windows
Empire State Building
Columbus Circle Stars
Wall Street Christmas Tree
Washington Square Park Christmas Tree
Secret Pet Christmas Tree at Central Park
Every year people from the community choose a tree in Central Park and decorate it with photos of their beloved pets that passed away. The location is kept secret. When the holidays are over, all the decorations are removed from the tree and stored until next year. You can find more details about this tree on the internet, but you can’t find it’s location there. As a respect for the community, I also am not disclosing it’s location.
Christmas Carols at Gramercy Park
Tuba Christmas at Rockefeller Center
Union Square Winter Market
Madison Square Park Christmas Tree
Lotte Palace Christmas Tree and a Christmas recommended walk
Christmas at Bloomingdales
If you are looking for more Christmas suggestions, you are very welcome to join the Facebook groups: 'My Christmas in New York' and 'What to do in New York'.
Showing posts with label landmarks. Show all posts
Friday, November 9, 2018
Friday, March 4, 2016
5 Tips for Making the Most Out of the Next Snowstorm
If you live in North America, you probably don’t get too excited about snow. For many, snow is just a nuisance that needs to be cleared out of the driveway, but there is much more to snow than just shoveling. For photographers, snowstorms will give a new and fresh look to a familiar sight. Even in New York City, one of the most photographed cities in the world, you can capture exceptional, never seen before, images during snowstorms. Ask any Eskimo, and he will tell you that snow can come in many forms, each is unique and will have different effect on the environment and therefore on your photos. With that in mind, I compiled some tips that will be helpful if you want to get the best of the next snowstorm.
1. Protect yourself
Leaving the house during a snowstorm or a blizzard can be a very bad idea if you are not prepared. Staying dry, warm and safe while being out in the storm should be your number one priority. Before leaving the house make sure to take with you waterproof gloves and knee-high snow boots. If you have ski equipment, don’t hesitate to use it for your photo shoot. I always wear my waterproof ski outfit when I’m out photographing in the storm. This includes ski mask and goggles. Goggles are especially useful during blizzards as the combination of wind and snow is very painful for the eyes. Underneath all of the above, I wear thermals long sleeved shirt, leggings and socks. Another thing that always helps me stay warm are hand warmers, and my favorite hack is to put them inside the boots.
2. Protect your equipment
As I see it, there are three main options to protect your gear during a storm. The first one, if you are dealing with light snow and no wind, is to go commando - hiding the camera under a jacket or umbrella if you have a friend with you. Some DSLR cameras are weatherproof and my Canon has suffered through many trips in snowstorms without any layers of protection. The second option is buying a camera water protector. I bought one around $10 and it worked beautifully during the latest, 2016 blizzard Jonas. Having said that, if you move around and don’t use a tripod it is not the most convenient option for operating the camera. So a third option is to create your own water protector by using the thickest garbage bag you can find. You simply cut a hole in the bag for the lens, then place the camera inside the bag with just the end of the lens sticking out through the hole. Now, you can mount the lens hood over the plastic bag to keep it from moving and blocking your view. A rubber band can be used as an additional safety measure.
3. Take a friend
During snowstorms the streets are usually empty. A person standing in the middle of the road, holding a black umbrella, can make the difference between a nice photo and an exceptional one. However, finding someone in that perfect position is not an easy task. Moreover, waiting for the right moment to come during a storm can be exhausting. Sending a friend to pose for you, holding that perfect colored umbrella you bought in advance, is much easier and highly recommended for the quality of your photos as well as your safety.
4. Look for landmarks
So you are out on the city streets, during a snowstorm, looking for your next shot. Including the city’s landmarks in your photos is going to be a safe bet. In New York City for example, aim for composition that will make the location recognizable, such as a subway station entrance, Empire State Building and yellow cabs. These will provide an instant context and their familiarity will be the initial bond of the spectator with the photo.
5. Put the finishing touches
Now, after walking in the storm and taking all these images, you come back home only to find out that the beautiful snowflakes are nowhere to be seen. No worries, a few steps in any photo editing app can transform your images from that old winter look to the new and fresh 'winter wonderland' look. A few basic steps that I always start from can help you make that change: Take the highlights down, clarity up and get rid of the shadows. As a result, more details will appear in the image, including the snowflakes. After doing these three steps, you can now better appreciate the quality of your image.
More Tips:
5 Tips for Capturing Beautiful Photos at the Zoo
1. Protect yourself
Leaving the house during a snowstorm or a blizzard can be a very bad idea if you are not prepared. Staying dry, warm and safe while being out in the storm should be your number one priority. Before leaving the house make sure to take with you waterproof gloves and knee-high snow boots. If you have ski equipment, don’t hesitate to use it for your photo shoot. I always wear my waterproof ski outfit when I’m out photographing in the storm. This includes ski mask and goggles. Goggles are especially useful during blizzards as the combination of wind and snow is very painful for the eyes. Underneath all of the above, I wear thermals long sleeved shirt, leggings and socks. Another thing that always helps me stay warm are hand warmers, and my favorite hack is to put them inside the boots.
2. Protect your equipment
As I see it, there are three main options to protect your gear during a storm. The first one, if you are dealing with light snow and no wind, is to go commando - hiding the camera under a jacket or umbrella if you have a friend with you. Some DSLR cameras are weatherproof and my Canon has suffered through many trips in snowstorms without any layers of protection. The second option is buying a camera water protector. I bought one around $10 and it worked beautifully during the latest, 2016 blizzard Jonas. Having said that, if you move around and don’t use a tripod it is not the most convenient option for operating the camera. So a third option is to create your own water protector by using the thickest garbage bag you can find. You simply cut a hole in the bag for the lens, then place the camera inside the bag with just the end of the lens sticking out through the hole. Now, you can mount the lens hood over the plastic bag to keep it from moving and blocking your view. A rubber band can be used as an additional safety measure.
3. Take a friend
During snowstorms the streets are usually empty. A person standing in the middle of the road, holding a black umbrella, can make the difference between a nice photo and an exceptional one. However, finding someone in that perfect position is not an easy task. Moreover, waiting for the right moment to come during a storm can be exhausting. Sending a friend to pose for you, holding that perfect colored umbrella you bought in advance, is much easier and highly recommended for the quality of your photos as well as your safety.
4. Look for landmarks
So you are out on the city streets, during a snowstorm, looking for your next shot. Including the city’s landmarks in your photos is going to be a safe bet. In New York City for example, aim for composition that will make the location recognizable, such as a subway station entrance, Empire State Building and yellow cabs. These will provide an instant context and their familiarity will be the initial bond of the spectator with the photo.
5. Put the finishing touches
Now, after walking in the storm and taking all these images, you come back home only to find out that the beautiful snowflakes are nowhere to be seen. No worries, a few steps in any photo editing app can transform your images from that old winter look to the new and fresh 'winter wonderland' look. A few basic steps that I always start from can help you make that change: Take the highlights down, clarity up and get rid of the shadows. As a result, more details will appear in the image, including the snowflakes. After doing these three steps, you can now better appreciate the quality of your image.
More Tips:
5 Tips for Capturing Beautiful Photos at the Zoo
Subscribe to:
Posts (Atom)